
9.14 BUILD JAVA WEB SERVICE PROJECT TO ACCESS COURSE TABLE IN OUR SAMPLE DATABASE
We have provided very detailed discussions and analyses on accessing and manipulating the Faculty Table in our sample database. Starting from this section, we will concentrate on access-ing and manipulating data in the Course Table in our sample database.
9.14.1 Create a New Java Web Application Project, WebAppCourse
First let’s create a new Java Web Application project as a container. Perform the following opera-tions to create our new Web application, WebAppCourse:
1) Launch NetBeans IDE 12.0 and choose File > New Project. Expand the Java with Ant folder and select JavaWeb from the Categories list and Web Application from the Projects list, then click on the Next button.
2) Name the project WebAppCourse and click on the Browse button to select a desired location for the project. In this application, we used the C:\Class DB Projects\ Chapter 9 as our project location. Click on the Next button to continue.
3) Select GlassFish Server as our Web Server and Java EE 7 Web as the Java EE version, your finished Server and Settings wizard should match the one shown in Figure 9.71. Click on the Next button to go to the next wizard.
4) In the opened Frameworks wizard, click on the Finish button to complete the new appli-cation creation process.
Now that a Web application has been created with a selected Web container, next we can create our new Web service project WebServiceCourse.
9.14.2 Create a New Java SOAP-Based Web Service Project WebServiceCourse
The function of this Web service is to execute related operations in this Web service and further-more to call the associated methods defined in our Java session beans to perform data queries and manipulations to the Course Table in our sample database.
Perform the following operations to create this new Web service project, WebServiceCourse:
1) In the Projects window, right-click on our new created project, WebAppCourse, and select the New > Other menu item to open the New File wizard.
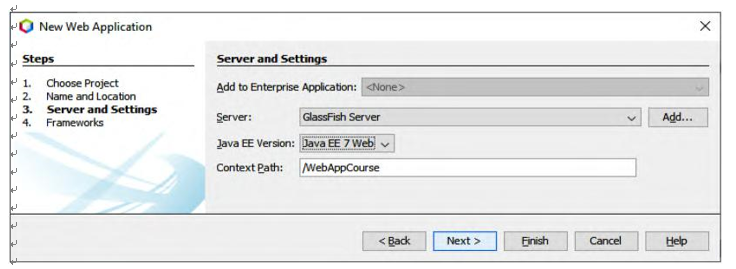
FIGURE 9.71 The finished Server and Settings wizard.

FIGURE 9.72 The finished Name and Location wizard.
2) Select Web Services from the Categories list and Web Service from the File Types list, and click on the Next button.
3) Name the Web service WebServiceCourse and type org.ws.oracle into the
Package field. Leave Create Web Service from Scratch selected.
Your finished Name and Location wizard should match the one shown in Figure 9.72. Click on the Finish button to complete this process.