
9.15.3 Build Code for the Select Button Event Handler to Query CourseIDs
The function of this method is to query all course _ id taught by the selected faculty member when the Select button is clicked by the user. The queried result will be added and displayed in the Course ID List box in this CourseFrame Form window.
In the opened Design view of the CourseFrame Form window, double-click on the Select button to open this method or event handler. Enter the code shown in Figure 9.87 into this event handler. Let’s have a closer look at this piece of new added code to see how it works.
- A local variable, al, is created first, and it is an ArrayList instance, and it can be used to hold the query result in which all selected course _ id values are stored.
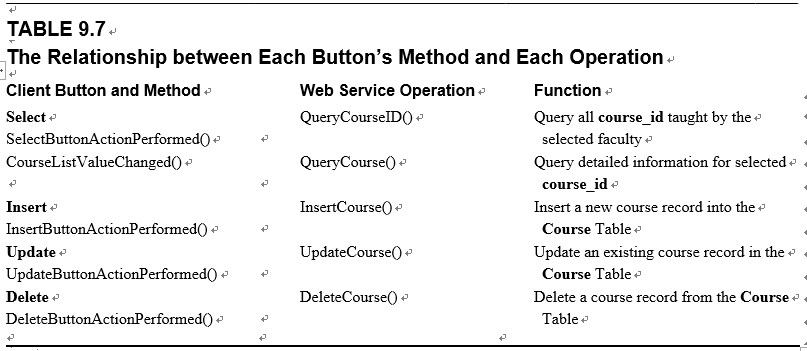
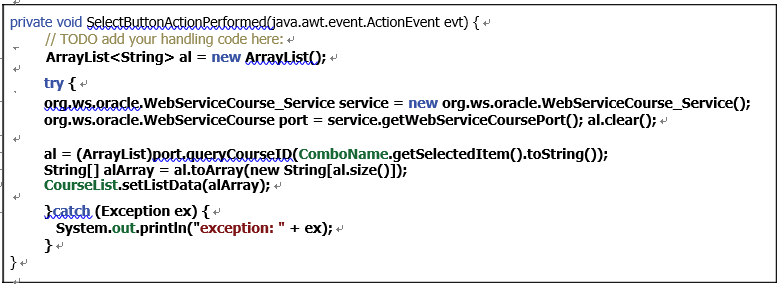
FIGURE 9.87 The complete code for the SelectButtonActionPerformed() event handler.
B. A try-catch block is used to call our Web service operation, QueryCourseID(), to perform the query action. First a new Web service instance, service, is created based on our Web service class, WebServiceCourse _ Service. Then the getWebServi-ceCoursePort() method is executed to get the current port used by our Web service. This port is returned and assigned to a new port instance, port.
C. The ArrayList instance al is first cleaned to make it ready to store all queried course _ id.
D. The Web service operation QueryCourseID() is called to perform the course data query to collect all course _ id taught by the selected faculty member that is obtained from the ComboName combo box. The query result is returned and assigned to the local ArrayList instance al.
E. A conversion between an ArrayList object and a standard String array object is performed since we need to add this query result into the CourseList, but the latter can only accept a String array, not an ArrayList, as an argument to be added into this list.
F. The converted query results are sent to the Course ID List variable, CourseList, to have them displayed there using the setListData() method.
G. The catch block is used to track and display any possible exception during this course _ id query process.
Now we have finished all coding process for calling one of our Web service operations, QueryCourseID(), to query all course _ id based on the selected faculty member. Click on the Clean and Build Project button to build our project.
Before we can run and test our client project, two more issues must be solved: 1) make sure that our Web Service application project, WebAppCourse, has been built and deployed successfully. 2) Ensure the CourseFrame.java has been selected as the main class file.
Perform the following operations to set upCourseFrame.java as a main class file:
1) Right-click on our client project WinClientCourse _ Select from the Projects win-dow, and select the Properties item at the bottom to open the Project Properties wizard.
2) In the opened wizard, click on the Run node on the left.
3) Enter or select the CourseFrame item in the Main Class box on the right by clicking the Browse button if you want to select it.
4) Click on the OK button to complete the main class setup process.
Click on the Run Main Project button to run our client project to test the course _ id query function. Select the CourseFrame as our main class and click on the OK button to the Run Project dialog if it is displayed to run our project.
In the opened client project, keep the default faculty member Ying Bai unchanged and click on the Select button to query all course _ id taught by this selected faculty. Immediately you can see that all four courses or four course _ id taught by this faculty member have been returned and displayed in the Course ID List box, as shown in Figure 9.88.
You can also try to query course _ id for other faculty members by selecting other faculty mem-bers from the Faculty Name combo box. Our client project in querying course _ id is very successful.
Next let’s take care of the code for the CourseListValueChanged() method to query the detailed course information for a selected course _ id from the Course ID List.