
9.13.5 Build and Run Our Client Project to Update and Delete Faculty Record via Web Service
Prior to building and running our Web client project, build and deploy our Web Service project to make it ready. Click on the Clean and Build Main Project button to build our client proj-ect. If everything is fine, click on the Run Main Project button (greenarrow) to run our client project.
The Faculty.jsp page is displayed. First let’s perform a faculty query action. Select a desired faculty member, such as Ying Bai, from the Faculty Name combo box and click on the Select button to query the detailed information for this faculty. The queried result is displayed in seven TextFields and the Image Box with the selected faculty image.
Now enter an updated faculty record with these six pieces of updated faculty information into six TextFields (keep the Faculty ID with no change), which is shown in Figure 9.68.
| • | Name: | Michael Bai |
| • | Title: | Assistant Professor |
| • | Office: | MTC-200 |
| • | Phone: | 750–378–2000 |
| • | College: | Stanford University |
| • | Email: | [email protected] |
Then click on the Browse button located on the right of the Image label on the top to select a desired image for this updated faculty member, such as Michael.jpg. All faculty image files are located in the folder Images\Faculty, which is in the Students folder at the CRC Press ftp site. You can copy all of image files and store them to one of your local folders to use them.
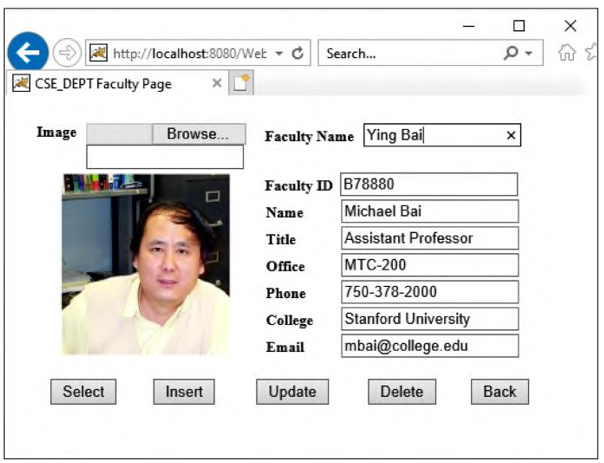
FIGURE 9.68 Six pieces of updated faculty information.
Now click on the Update button to try to call our Web service operation, UpdateFaculty(), to update this faculty record in the Faculty Table in our sample database.
To confirm this data update action, two methods can be used. First we can perform another query for the updated faculty Michael Bai by typing the updated faculty name Michael Bai into the Faculty Name field. Then click on the Select button to try to retrieve it. Now you can see that six pieces of updated faculty information for the updated faculty member Michael Bai with an updated faculty image have been retrieved and displayed in this page, as shown in Figure 9.69.
The second way to check and confirm the data update is to open our Faculty Table using either the Services window in the NetBeans IDE or the Oracle SQL Developer.
Now let’s test the faculty delete action by calling our Web service operation, DeleteFaculty(). First let’s perform another faculty update action to recover the faculty member Ying Bai’s record. Enter the six pieces of original information shown in Table 9.6 into the six associated fields in this page and select the faculty image named Bai.jpg. Click on the Update button to complete the data update.
Now type the updated faculty name Ying Bai into the Faculty Name field and click on the Select button to retrieve this updated faculty record. Then click on the Delete button to try to delete this faculty record.
To confirm the data delete action, click on the Select button again to try to retrieve this faculty record from our sample database. An empty page is displayed, as shown in Figure 9.70, to indicate that no matching faculty can be found from our sample database. Our data delete is successful!
To make our sample database clean and neat, it is highly recommended to recover this deleted faculty member and related records in our Faculty, LogIn, Course and StudentCourse Tables. Refer to Section 9.11.3 with Tables 9.2~9.4 to complete the data recovery.
A complete Web client project, WebClientFaculty _ UpdtDelt, can be found in the folder Class DB Projects\Chapter 9 in the Students folder at the CRC Press ftp site (refer to Figure 1.2 in Chapter 1). Next let’s discuss how to build a Web service to access and manipulate data against the Course table in our sample Oracle database.
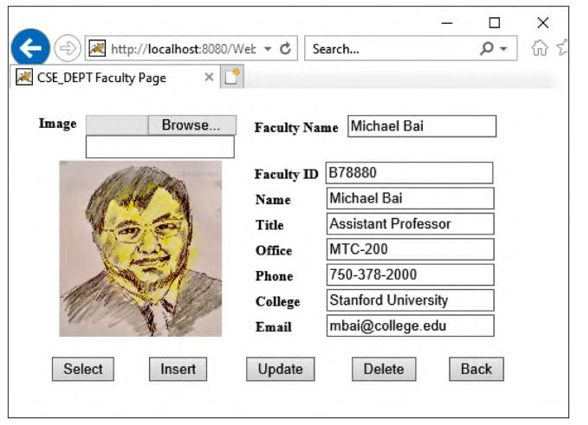
FIGURE 9.69 The confirmation of an updated faculty record.
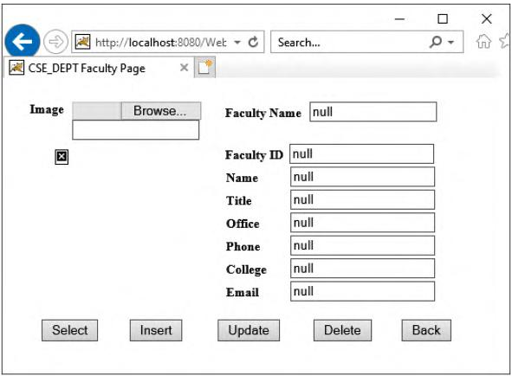
FIGURE 9.70 The confirmed result for the deleted faculty record.